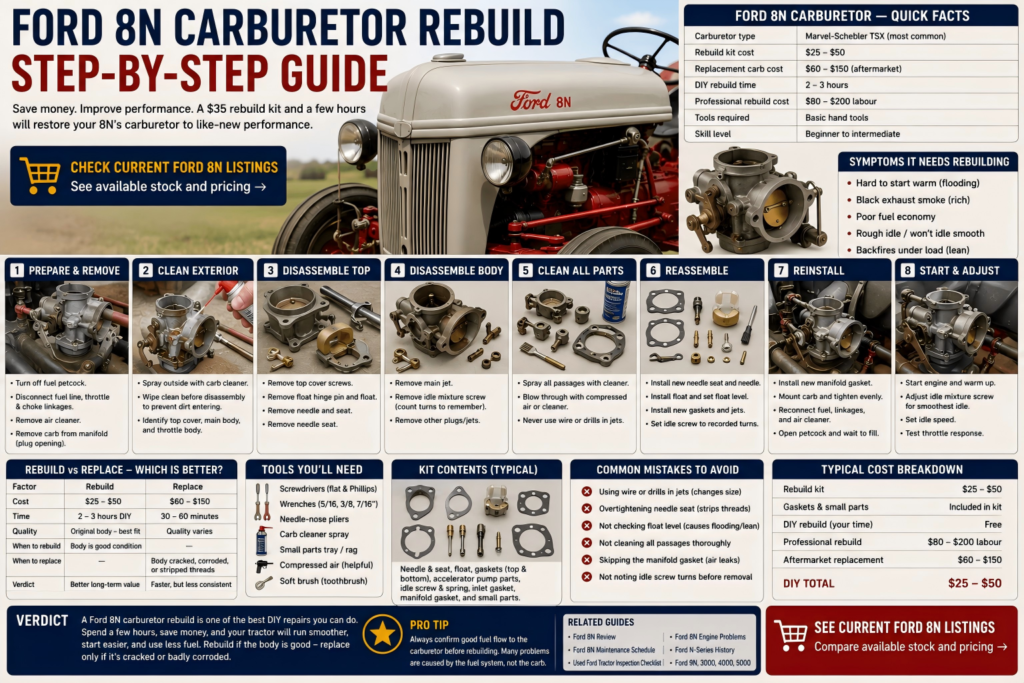
A Ford 8N carburetor rebuild is one of the most manageable DIY repairs on a classic Ford tractor — takes 2–3 hours, requires basic tools, and a rebuild kit costs $25–$50. The Ford 8N uses a Marvel-Schebler TSX carburettor in most configurations — a simple, well-documented design that has been rebuilt by hobbyists and mechanics for over 70 years. This guide covers when to rebuild, rebuild vs replace, what kit to buy, tools needed, the step-by-step process, and what the job costs.
👉 Check current Ford 8N listings — see available stock and pricing →
Written by: Farmers Equipment editorial team — specialising in classic Ford tractors from the N-Series through the Thousand Series.
Ford 8N Carburetor — Quick Facts
| Item | Detail |
|---|---|
| Carburetor type | Marvel-Schebler TSX (most common) — some late models vary |
| Rebuild kit cost | $25–$50 |
| Replacement carburetor cost | $60–$150 (aftermarket) |
| DIY rebuild time | 2–3 hours for a first rebuild |
| Professional rebuild cost | $80–$200 labour |
| Tools required | Basic hand tools — no specialist equipment |
| Skill level | Beginner to intermediate mechanical |
Symptoms That Indicate a Ford 8N Carburetor Needs Rebuilding
Five signs a carburetor rebuild or replacement is needed:
| Symptom | Carburetor Cause | Confirm Before Rebuilding |
|---|---|---|
| Hard to start warm — engine floods | Worn needle and seat — fuel continues flowing when stopped | Check for fuel dripping from carb after shutdown |
| Black exhaust smoke | Over-rich mixture — stuck float, worn jets | Rule out blocked air cleaner first |
| Poor fuel economy | Float level too high, worn main jet | Check air cleaner condition first |
| Rough idle / won’t idle smoothly | Blocked idle jet, air leak at carb base | Check for air leak with carb cleaner spray |
| Engine runs lean — backfires under load | Blocked main jet, low float level | Check fuel delivery from tank first |
Before rebuilding: confirm the problem is the carburettor and not the fuel supply. A blocked fuel filter, kinked fuel line, or failing fuel sediment bowl can cause identical symptoms to a faulty carburettor. Check fuel flow at the carburettor inlet before disassembly — fuel should flow freely when the petcock is open and the fuel line is disconnected.
Rebuild vs Replace — Which Is Better?
| Factor | Rebuild | Replace |
|---|---|---|
| Cost | $25–$50 (kit only) | $60–$150 (aftermarket carb) |
| Time | 2–3 hours DIY | 30–60 minutes to swap |
| Quality | Original carb body — best fit when cleaned properly | Aftermarket quality varies widely |
| When to rebuild | Carb body is in good condition — no cracks, threads intact | Body is corroded, cracked, or stripped threads |
| When to replace | — | Carb body damaged beyond repair, or time is the priority |
| Verdict | Better long-term outcome if done carefully | Faster, but aftermarket quality inconsistent |
The recommendation: rebuild the original carburettor if the body is sound. The original Marvel-Schebler carburettor body was made to tighter tolerances than most modern Chinese aftermarket replacements — a correctly rebuilt original generally outperforms a budget replacement. If the original body is damaged or heavily corroded, a quality aftermarket replacement (Zenith or Farmcraft brands are preferred over lowest-cost options) is a practical alternative.
Best Ford 8N Carburetor Rebuild Kits
Rebuild kits for the Ford 8N Marvel-Schebler TSX carburettor are widely available. Quality varies:
- Farmcraft / Agri-Fab kits — well-regarded quality for TSX carburettor rebuilds. Good gasket material, correct needle and seat dimensions. Available from Steiner Tractor Parts and similar suppliers
- Niche TSX rebuild kits — several suppliers specialise specifically in TSX carburettor kits for Ford N-Series. These typically include the needle, seat, float, gaskets, and accelerator pump components as a complete set
- Generic TSX kits (eBay / Amazon) — inexpensive but variable quality. Gasket material is sometimes too thin or incorrectly dimensioned, and needle and seat fit may be imprecise. Acceptable for a temporary fix, not a long-term solution
What a complete kit should include:
- Inlet needle and seat
- Float (or float inspection — not always included)
- Carburettor body gaskets (upper and lower)
- Manifold gasket
- Accelerator pump and check ball
- Idle mixture screw and spring
- Fuel inlet fitting gasket
Where to buy: Steiner Tractor Parts, Yesterday’s Tractors, and All States Ag Parts all stock quality TSX rebuild kits for the Ford 8N.
Tools Required for Ford 8N Carburetor Rebuild
- Flathead and Phillips screwdrivers (various sizes)
- Small open-end wrenches (5/16, 3/8, 7/16 inch)
- Needle-nose pliers
- Carburettor cleaner spray (a can of spray carb cleaner)
- Small parts tray or clean rag to organise components
- Compressed air (helpful but not essential — carb cleaner spray can substitute)
- Soft brush (toothbrush works well) for cleaning passages
- Petroleum jelly or light grease (for gasket seating)
- Clean, well-lit workspace
No specialist tools required. The TSX carburettor is designed to be serviced with hand tools available in any basic toolkit.
Ford 8N Carburetor Rebuild — Step by Step
Step 1 — Prepare and Remove
- Turn off the fuel petcock under the fuel tank — confirm fuel flow has stopped before disconnecting any lines
- Disconnect the fuel line at the carburettor inlet — have a rag ready for residual fuel
- Disconnect the throttle linkage and choke linkage from the carburettor. Note their positions or photograph before disconnecting
- Remove the air cleaner assembly from the carburettor intake
- Remove the two nuts or bolts holding the carburettor to the intake manifold
- Lift the carburettor off the manifold and plug the manifold opening with a clean rag to prevent debris entering the engine during the rebuild
Step 2 — External Cleaning
- Spray the outside of the carburettor body with carburettor cleaner and wipe down with a rag before disassembly. Starting clean prevents external dirt from entering the internal passages during disassembly
- Identify the main components: the top cover (with the fuel inlet and float), the main body (with jets and passages), and the throttle body (lowest section with the throttle plate)
Step 3 — Disassemble the Top Cover
- Remove the screws holding the top cover to the main body — typically 3–4 screws
- Lift the top cover carefully — the float is attached and will lift with it
- Inspect the float: press gently on all sides and listen for any sloshing — a float with fuel inside has a hole and must be replaced. Shake gently near your ear. A perfect float sounds empty and solid
- Remove the float by sliding out the hinge pin
- Remove the inlet needle from the needle seat — note the orientation
- Unscrew the needle seat from the carburettor body using the correct screwdriver or seat removal tool
Step 4 — Disassemble the Main Body
- Remove the main jet (usually a brass plug in the bottom or side of the main body) — use the correct size flathead screwdriver and do not force it
- Remove the idle mixture screw — count and note the number of turns as you remove it so you can set it to the same position during reassembly
- Remove any other plugs or jets as identified in the kit instructions
- Do not remove the throttle plate or throttle shaft unless specifically necessary — these are set at the factory and reassembly requires care to maintain correct alignment
Step 5 — Clean All Components
- Spray all passages in the carburettor body with carburettor cleaner — every small hole and passage. Hold up to light and confirm you can see through each passage
- Use compressed air or a can of compressed gas to blow through all passages — this is the most important cleaning step. Blocked passages cause poor mixture regardless of new gaskets
- Clean the main jet by spraying through it — never use wire or drill bits to clean jets. Wire enlarges the jet orifice and permanently changes the fuel mixture
- Soak the carburettor body in carburettor dip solution if available (30 minutes) — this dissolves varnish deposits that spray cleaner alone may not remove
- Clean all metal components — float, cover, body — and dry thoroughly before reassembly
Step 6 — Reassemble with New Kit Components
- Install the new needle seat — screw in snugly but do not overtighten
- Install the new inlet needle — ensure it seats correctly in the seat
- Reinstall the float on its hinge pin — with the needle attached, the float should hang freely and move smoothly
- Check float level: with the top cover held horizontally (needle seated), the float should be parallel to the cover or within the specification in your kit instructions. Bend the float tab gently to adjust if needed
- Install the new gasket on the top cover and reattach the cover to the main body
- Install the new main jet
- Install the new idle mixture screw — turn in gently until it seats (do not overtighten), then back out the same number of turns as you recorded during removal
- Install any remaining new gaskets and plugs from the kit
Step 7 — Reinstall and Adjust
- Remove the rag from the intake manifold
- Install a new manifold gasket — this is included in most kits and prevents air leaks that cause lean running
- Mount the carburettor to the manifold and tighten the nuts evenly
- Reconnect the fuel line, throttle linkage, and choke linkage
- Reconnect the air cleaner
- Open the fuel petcock and wait 30 seconds for the float bowl to fill before attempting to start
Step 8 — Initial Start and Adjustment
- Start the engine — it may take several cranks to prime the system after the carburettor was dry
- Allow to warm up for 5 minutes
- With the engine at idle, slowly turn the idle mixture screw in until the idle speed drops, then back out until the engine runs smoothest — this is the correct idle mixture setting
- Set idle speed with the throttle stop screw to the desired idle RPM (approximately 400–500 RPM on most 8N machines)
- Blip the throttle several times to confirm clean acceleration without stumbling — a stumble indicates the accelerator pump is not delivering correctly or the main jet is partially blocked
How Long Does a Carburetor Rebuild Take?
A first-time rebuild on a Ford 8N TSX carburettor typically takes 2–3 hours including removal, cleaning, reassembly, and reinstallation. An experienced person who has rebuilt TSX carburettors before can complete the job in under an hour. Allow extra time for cleaning if the carburettor has significant varnish build-up from old fuel.
What Does a Ford 8N Carburetor Rebuild Cost?
| Approach | Cost | Notes |
|---|---|---|
| DIY rebuild kit only | $25–$50 | Best value — original body retained |
| Aftermarket replacement carburettor (budget) | $40–$80 | Variable quality — Zenith or Farmcraft preferred over no-name |
| Aftermarket replacement carburettor (quality) | $80–$150 | Better fit and durability than budget options |
| Professional rebuild (labour only) | $80–$200 | Add parts cost — shop total approximately $130–$250 |
| Specialist carburettor rebuilder | $100–$300 exchange | Send in your carb, receive a rebuilt unit — useful if body is badly corroded |
Is it cheaper to rebuild or replace? Rebuild is always cheaper if the original body is in serviceable condition — a $35 kit versus $60–$150 for a replacement. The rebuild also typically produces a better result with the original body. Replace only when the body is damaged beyond reasonable repair.
Common Mistakes During a Ford 8N Carburetor Rebuild
- Using wire or drills to clean jets — this enlarges the jet orifice permanently and permanently richens the mixture. Use carburettor cleaner spray and compressed air only
- Overtightening the needle seat — the seat is threaded into aluminium or zinc carburettor body. Overtightening strips the threads. Snug plus a quarter turn is sufficient
- Not checking float level — an incorrectly set float level causes flooding or lean running regardless of other work done. Always check and adjust before closing the top cover
- Not cleaning all passages — partial cleaning that leaves one idle passage blocked causes rough idle even with all new gaskets fitted. Hold the body to a light source and confirm you can see through every passage
- Skipping the manifold gasket — an air leak between the carburettor and manifold causes a persistent lean condition and rough idle. Always use the new manifold gasket from the kit
- Not noting the idle mixture screw position before removal — the number of turns from seated to the original position is your baseline setting. If you don’t record it, you have to start from scratch with the adjustment
Verdict — Ford 8N Carburetor Rebuild
A Ford 8N carburetor rebuild is one of the most rewarding and cost-effective DIY maintenance tasks on a classic Ford. A $35 kit, 2–3 hours, and basic tools restore carburettor function that may have been deteriorating for years. The Marvel-Schebler TSX carburettor is simple, well-documented, and forgiving of a careful first-time rebuild. If the engine stumbles, floods, or runs rough and the ignition system has already been serviced — the carburettor is the next logical step.
For related maintenance guidance: Ford 8N Engine Problems · Ford 8N Maintenance Schedule · Ford 8N Oil Type and Capacity →
Before purchasing a Ford 8N: Ford 8N review · Used Ford Tractor Inspection Checklist →
Also available: Ford 9N · Ford 3000 · Ford 4000 · Ford 5000
👉 See current Ford 8N listings →
Frequently Asked Questions
How do I know if my Ford 8N carburetor needs rebuilding?
Five key symptoms: difficulty restarting when warm (flooding), black exhaust smoke (rich mixture), rough or unstable idle, poor fuel economy, or backfiring under load (lean condition). First rule out a blocked air cleaner and confirm good fuel supply before disassembling the carburettor — these symptoms can share causes.
Is it better to rebuild or replace a Ford 8N carburetor?
Rebuild if the original body is sound — a correctly rebuilt original TSX carburettor generally outperforms a budget aftermarket replacement. Replace if the body is cracked, heavily corroded, or has stripped threads. A rebuild kit costs $25–$50; a quality replacement carburettor costs $80–$150.
How much does a Ford 8N carburetor rebuild cost?
DIY: $25–$50 for the rebuild kit. Professional rebuild: $130–$250 total (labour plus parts). A new aftermarket carburettor costs $60–$150 depending on quality. Budget-tier replacements are available for less but are inconsistent in quality — Zenith and Farmcraft brands are preferred by experienced Ford owners.
How long does a carburetor rebuild take?
A first-time Ford 8N TSX carburettor rebuild takes approximately 2–3 hours including removal, disassembly, cleaning, reassembly, and reinstallation. An experienced person completes it in under an hour. Allow extra time for soaking if significant varnish build-up is present from old fuel.
What carburetor does a Ford 8N use?
Most Ford 8N tractors use a Marvel-Schebler TSX carburettor. Some late production or dealer-modified machines may have variations, but the TSX is by far the most common. Confirm your specific model before ordering a rebuild kit — the kit must match the exact TSX variant on your machine.